You know, when I first opened the Databank in Wuthering Waves and saw that "Enhanced Drop Rate" percentage sitting there like a cryptic riddle, I almost closed the game and took a nap. I mean, what does it actually do? The game throws a lot of mechanics at you—Tacet Fields, Waveplates, Echo tuning—but this one felt like a secret handshake only the lucky few understood. After countless boss runs, a few facepalms, and a solid 600 hours across two accounts, I’ve got the system down to a science. Let me break it down in plain English, with just enough sass to keep you awake.
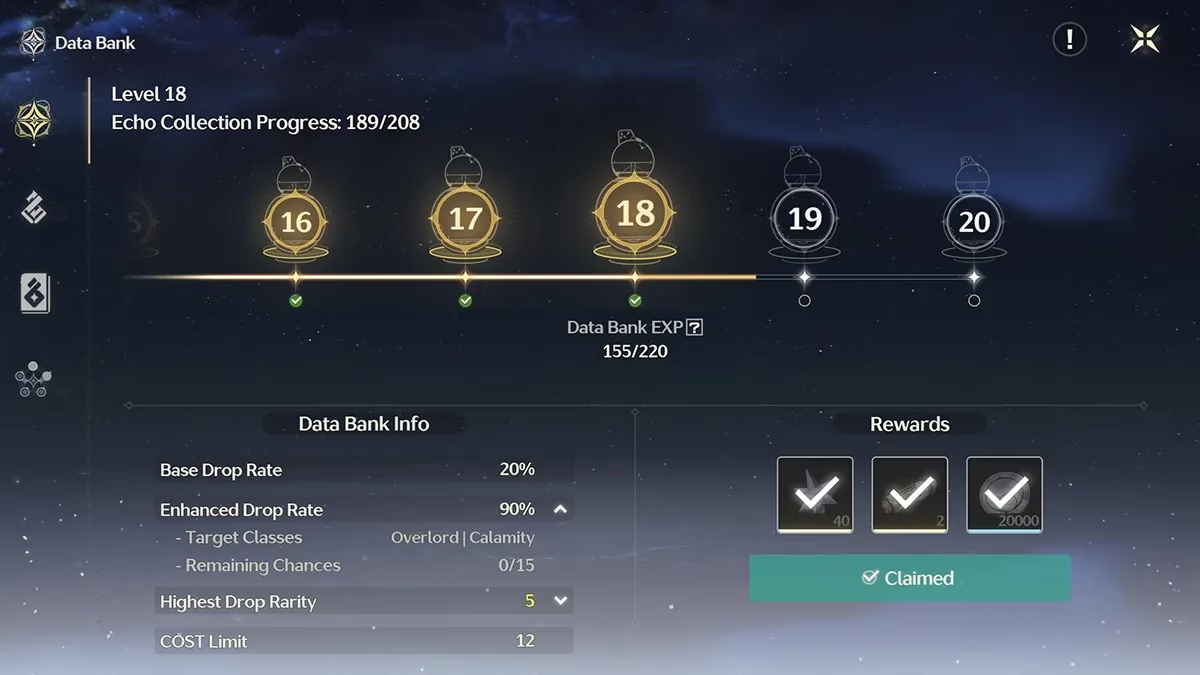
So, what’s the big deal? At the bottom of the Databank screen, you’ll spot that dropdown menu labeled "Enhanced Drop Rate." Inside, two terms jump out: Target Class and Remaining Chances. In a nutshell, the Target Class tells you which enemy type gets a boosted Echo drop rate—specifically Overlord (world bosses) and Calamity (story bosses). The Remaining Chances, meanwhile, are your weekly allowance of these boosted drops. You get 15 enhanced drops per week, and they reset every Monday at 5:00 AM EST. Simple, right? Well…
Here’s the first twist that nobody tells you: your Databank level is the real puppet master. Until you hit Databank level 7, the best Echo you can snag is a measly 3-star. Push to level 14, and 4-star Echoes finally appear. At level 15, the gates to 5-star heaven swing open—but only with a 30% drop chance. That means seven out of ten boss kills will still toss you a 4-star Echo, which is about as useful as a screen door on a submarine once you’re gearing for endgame. At level 17, the split finally reaches a glorious 50/50 for 5-stars. So if you’ve been grinding bosses at level 10, wondering why your Echoes look like hand-me-downs… that’s why.
And here’s the kicker: Databank levels are locked behind your SOL3 Phase. To even reach Databank 15, you need Union Level 30 and SOL3 Phase Rank 4, which means you’ve beaten the second world ascension quest. I remember sprinting through those ascension quests like my life depended on it, only to realize I still had to grind Union EXP for days. Patience, young Rover.

Let’s talk farming strategy, because this is where most players bleed resources without even noticing. Until you hit that Union Rank 30 milestone, do not go ham on boss Echo farming. I get it, the FOMO is real—you want that perfect Crit Rate main stat right now—but you’ll just be throwing Waveplates and time into a pit. Low-rarity Echoes eat the same materials for tuning and leveling, and they’ll be obsolete the moment you unlock higher rarities. Treat yourself like a gardener, not a kid in a candy store: plant your resources carefully, and only harvest when the fruit is ripe.
Once you’ve unlocked 5-star Echoes, the actual boss farming loop is delightfully brain-off. Summon the boss, beat it into the ground, and—here’s the secret handshake—do not spend your Waveplates on the reward. After the boss dissolves, you can stand there for roughly two minutes until it respawns, or you can zip off and clear a couple of Tacet Fields, then come back. Rinse and repeat until an Echo drops with a usable main stat. No fuss, no Waveplate drain, just the quiet hum of efficiency.
Now, the part where I see even veteran players crash and burn: you only have 15 enhanced drops per week, so you better be pickier than a food critic at a gas station. Spreading those precious chances across a dozen different bosses because you’re building four teams simultaneously is a one-way ticket to Resource Poverty Town. I made that mistake in version 1.3, and I spent three weeks unable to clear the higher ToA floors because everyone was half-built. My advice—and trust me, I’ve got the gray hairs to prove it—focus on one team first. Get three characters to level 60 with decent 5-star Echoes, then start a second team only when that core can carry your world exploration and material farming. After Union Level 40, enemies leap from the low 50s to 70+, and if your squads are held together with duct tape and 4-star Echoes, you’ll be staring at the respawn screen more than the victory animation.
There’s an art to choosing which bosses deserve your enhanced drops. Think of it like dating: you can’t give everyone your best effort at once. Pick the carry of your main team—say, Jiyan or Jinhsi—and shower that boss with your 15 weekly boosts until you’ve got a serviceable Echo set. Once that character can comfortably bulldoze open-world content, you can shift attention to the next priority. By the time you push into Union Level 50, you’ll have two tight, synergistic teams that can handle whatever Kuro Games throws at you, and you won’t be one of those poor souls begging for co-op carries in the community Discord.
In summary, the Enhanced Drop Rate system is a classic Wuthering Waves move: simple on the surface, but with layers that can punish the unprepared. Raise your Databank, time your farming to post-Union Level 30, and guard those 15 weekly chances like they’re your last slice of pizza. Do that, and the Echo grind transforms from a nightmare into a steady, almost meditative rhythm. Now if you’ll excuse me, I need to go beat up a monkey for the fifteenth time this week. May your substats roll double Crit.